I didn’t realize how inadequate the cleats were on our 20-footer until I started keeping it at a dock and also anchoring out more. Actually the only cleat, other than the ones for the jib sheets, was a tiny little thing on the fore deck. When I pulled into my assigned slip for the first time, I realized I had to do something. Tying the stern to the dock using a dock line tied around the stern pulpit didn’t look like the best idea in the world.
Docking Considerations
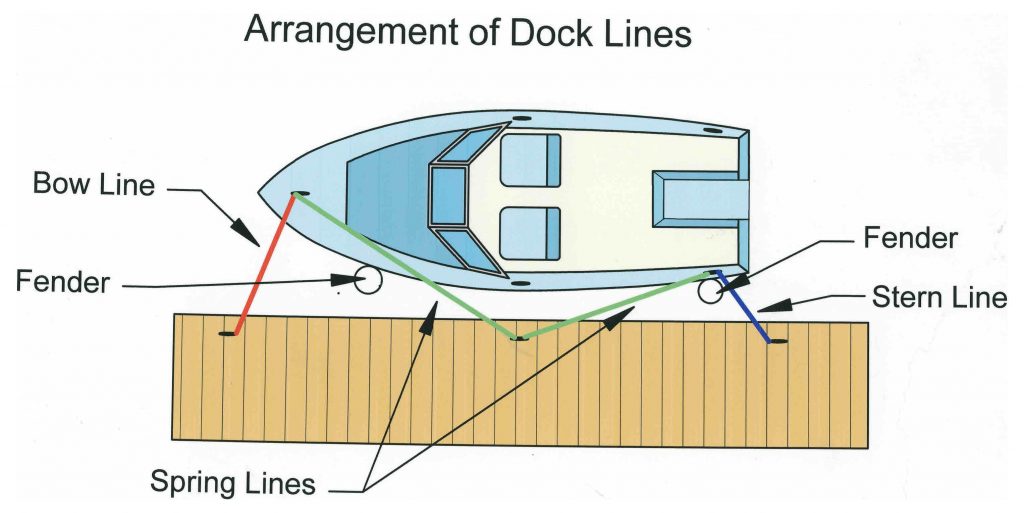
Before I start discussing adding the cleats, let’s look at a typical docking arrangement. If you are tied alongside a dock or pier, you need several different mooring lines to be secure. The first are bow and stern lines. These go from your boat to the dock and keep the boat parallel to the dock and prevent it from being blown away from the pier. You’ll need adequate fenders to protect the boat when the wind is blowing you against the dock.
Spring lines are used to prevent the boat from being blown forward or back in relation to the pier. On most small boats a bow or stern spring line is adequate. If your are tied to a fixed dock in tidal country, you need to consider the tidal range so you don’t come back to the boat and find it suspended above the water.
Another important consideration is how to cleat off the lines. At my dock, which is a floating dock, I drop the eye end of the docking lines over my cleats and tie the other end of the line off on the dock cleat. This allows me to quickly cast off and leave the line lying on the dock. When returning to my slip, I can easily drop the eye back over the cleat and have all lines remain correctly positioned.
On a fixed dock or in tidal ranges, cleat off the bitter end of the line on your boat. This will allow you to release or adjust the line even when it’s under some tension. With the line under tension, it may not be possible to generate enough slack to remove a docking line eye from the cleat.
The type of line is also important. When I had a slip in Tennessee, the standard mooring line is yellow polypropylene. I’ve been out on the dock in storms and the breaking poly lines sound like rifle shots. Most of the aluminum pontoon boats have battered and bent bows from lines breaking, allowing the boat to hit the dock. I use the yacht braid docking lines that can be found at your local boat store. They wear well, stretch a little to provide some give and last a long time. Be sure to inspect them often for wear and chafe.
In some areas slips are between pilings and will require double bow and stern lines as well as spring lines to locate the boat. Leave enough slack to get the boat close enough to get aboard but not enough for the boat to hit the pilings. And remember to check the tidal range. It may take a couple of tidal cycles to get the lines adjusted properly, allowing enough slack for the tide yet not enough for the boat to hit the pilings.
Adding Cleats
Back to the original problem, my 20-footer didn’t have enough cleats. In fact it only had one dinky little cleat on the fore deck. It was so small I couldn’t even get the docking line around it. So the first step was to replace this one with a decent cleat.
Luckily, the fasteners of the existing cleat were accessible from underneath in a small fore peak area. The original cleat was simply bolted through the fiberglass deck with no additional reinforcement. Considering the force that can be exerted on a mooring cleat, I had to provide additional support for the larger new cleat. An additional complication was that the deck was curved where the cleat would go
For the new cleat itself, I chose a large anodized aluminum cleat. It is called a “four hole open base cleat” since it has four 5/16” mounting holes as well as an opening between the mounting legs. This opening is very handy for passing the eye of a docking line through it and flipping it over the horns of the cleat, making a very secure mooring. I made sure the cleat was large enough to hold several docking lines.
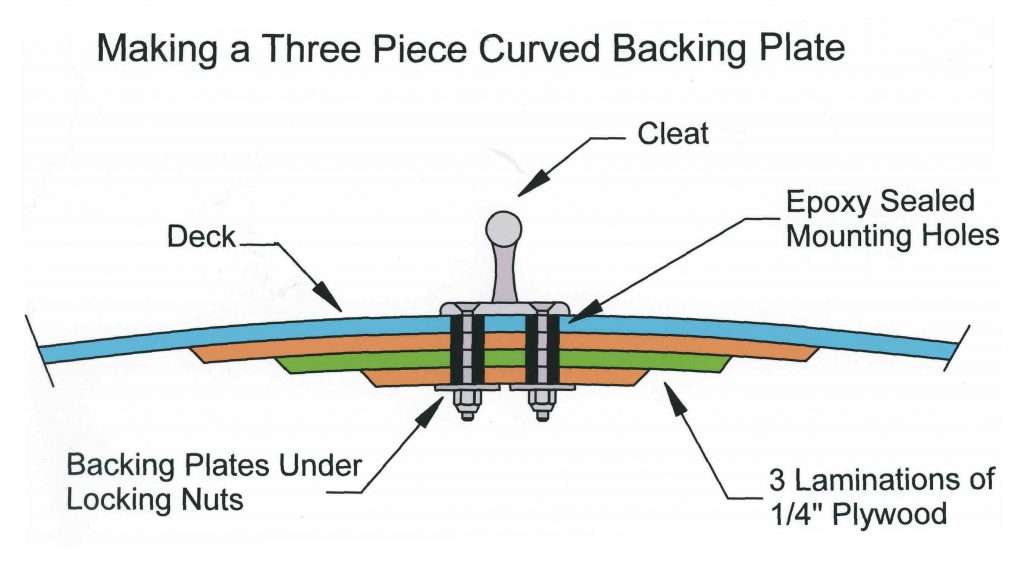
There are several ways of providing this support – aluminum plates, additional thicknesses of fiberglass or plywood backing plates. I chose to use three layers of 1/4” birch aircraft plywood for the backing. The plywood was available at my local model shop and is waterproof. The first layer was smaller, the second larger and the last larger still. The three layers of plywood were more flexible than a single layer of 3/4” plywood. The combination of different sized layers and the flexibility of the plywood allowed the plate to conform well to the curve of the deck. When epoxied together, it would form a rigid and strong backing plate.
I laid out and drilled the mounting holes through the deck and the three pieces of plywood. I buttered up the plywood pieces with an epoxy/filler mixture and temporarily bolted them in place. I was sure to coat the temporary bolts with grease so the epoxy wouldn’t bond them in place. Once the epoxy had cured, I removed the bolts and cleaned up the holes by drilling them slightly oversized. Several coats of epoxy on the birch plywood and the inside of the holes protected the deck and plywood from water intrusion.
With everything sealed, I reinstalled the cleat using 5/16” stainless steel oval-headed machine screws, with SS fender washers and locking nuts on the underside and plenty of sealant on the top side. I initially tightened the nuts just beyond finger tight. After the sealant had cured, I came back and retightened the nuts, compressing the sealant and forming a better seal.
The cockpit was utterly devoid of any cleats for docking or anchoring lines. I had been tying off the boat with a line around the stern pulpit. I was afraid any major storm or even a large wake might tear the pulpit loose. I decided to add a cleat on both the port and starboard cockpit coaming. Luckily, I was able to access these areas from inside the boat. On some boats you may have to go through the stern lockers to get to the underside of the new cleat area.
I again used three pieces of birch in varying lengths and widths to fit inside the coaming. The installation process was exactly the same as the one I used for the new bow cleat. The cleats were a little smaller than the bow cleats, since there was less room on the cockpit coaming. They were still large enough to tie off two docking lines or the anchor line.
Conclusion
With new bow and stern cleats I could now tie off to the dock with confidence. The new cleats also made my “Tennessee moor” easier. The lake I sailed on in Tennessee was a dammed-up river valley. The shores are steep and easy to get close to. When I wanted to spend a night in a quiet cove, I picked a likely looking tree near the shore. As I motored toward the tree, I dropped a Danforth anchor off the stern and paid out anchor line as I moved in. If I picked the right tree, I could pass a line around it without getting off the bow.
Once the line was around the tree, I shut down the motor. With one end of the bowline cleated off on the bow, I could pull in anchor line on the stern anchor to move the boat back out into the cove. When I got positioned properly, I cleated off the other end of the bowline as well as the stern anchor line. This kept me securely in position for the night and away from the shore bugs. The next morning I could uncleat one end of the bowline and pull it aboard without having to go back to shore. If I were in Europe, I’d have to call this a Med moor or Mediterranean moor.
Decently sized and properly installed cleats will add to your piece of mind, either docked or anchored out. Coupled with decent docking lines and anchor rode, it is cheap insurance.