If you’re like me you probably planned a few projects over the winter, for the boat and maybe the house. I had planned a few and after the fall season of raking leaves for days on end I was able to start on them.
First up was the upstairs hall. It had a rug, but we wanted to install oak flooring. After removing the rug, the subfloor was so out of level I had to remove it, level up all the floor joists and put down new subflooring. With that done I started installing the five-inch wide by three-quarter-inch thick oak floating floor. It took some time (about a month) because of interruptions but I got it done. However, we did not like the squeaking the floor made when we walked on it. So, I ended up making a template and drilling holes to screw it down and put wood plugs over the holes. Our floating floor is now anchored down! The floor is as solid as could be now and very quiet, we like the look of the plugs, and it all goes with the rest of the flooring.
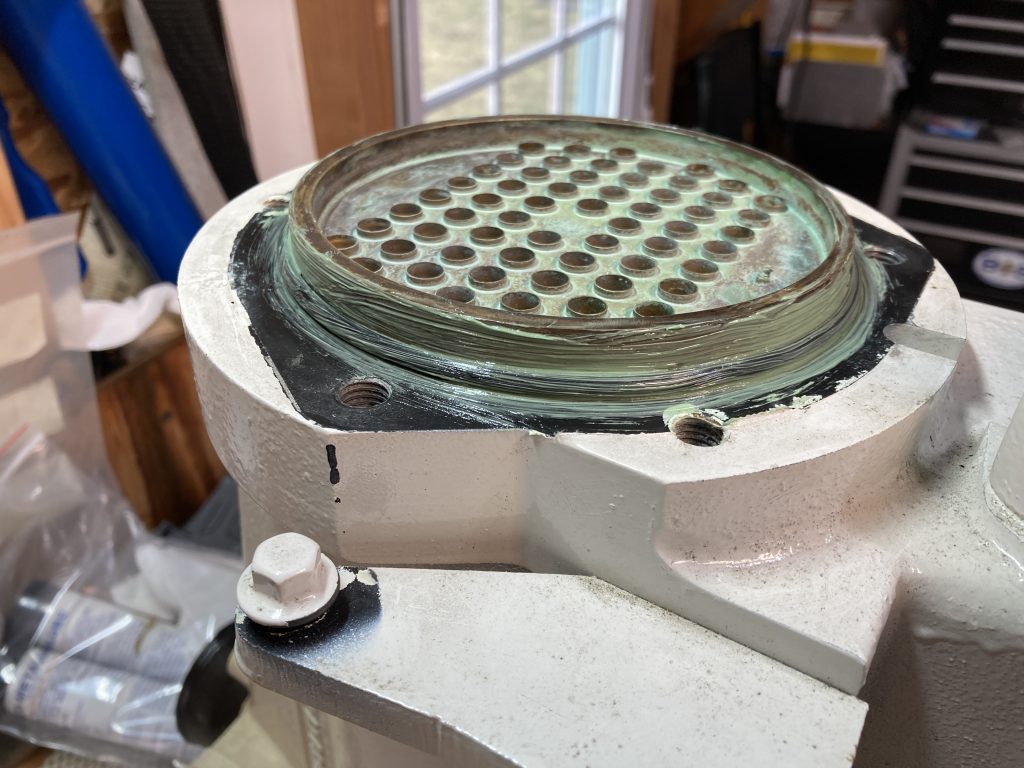
Next up was reassembling the aftercoolers. If you remember I removed them at the end of October (LIBW January/ February) took them apart to soak them in salt remover and then rinsed them off. Having been a fresh water boat until we purchased her in 2023 everything about this boat showed just how clean she is with no salt water corrosion. I was a little concerned with the aftercoolers because being roughly eighteen years old and never having been taken apart I did not know what to expect. Turns out they were just beautiful. I would not expect that to be the case with a salt water vessel.
There were a couple of details that I did not like about them though. From the factory, the stainless-steel bolts that screwed into the bronze end caps were installed dry, with no grease or never-seize at all. They put up a little fight coming out and I was worried the threads in the end caps could get ruined. They did come out without damage and when I reassembled the housing I used some metal lube grease on them.
The other detail that caught my attention was the complete lack of grease around the tube bundle (core), the housing and the o-ring seals. None at all. If this was a salt water boat from the start I doubt I would have been so lucky. It is recommended that this service be performed every three years.
So, besides lubricating the bolts when putting this all back together, I used a good coating of metal lube grease on all the mating surfaces and the o-ring seals. The cores slid nicely into the housing, much easier than having to use a rubber mallet to get them out. When I tightened down the end caps, I had a good bead of grease squeeze out from the sides indicating an even coating of grease on the mating surfaces. Once they were fully assembled, I covered the air and water openings to keep dirt, dust, and any other undesirables out of them while waiting for warmer weather to put it all back together.
The last item on my list that has to be done before hitting the water is a new oil pressure sensor. At the end of last season, I started seeing fluctuations in oil pressure. Sometimes it was higher than normal and other times lower than normal. After finding out where this sensor is located, I am not looking forward to doing this. It is on the left side of the engine block behind an aluminum plate that has the engine’s electronics mounted on it. This being the port engine having this issue means I will once again be laying over the top of the engine working upside down!
One thing that could really help keep any part of your engine that has salt water flowing through it is a fresh water flush-out kit. Most new engines, both inboards and outboards, have them already installed. It is not so hard to update your engine if it does not have one already and this could save you money and downtime.
Next up is a new floor in the den, over the slab. Oh, and a grandson coming near the end of February!