There was still a lot of work to get done before Keeper would be launched for the 2022 boating season. In the June issue of Long Island Boating World, “Go with the Flow”, I detailed how I was able to lower the port engine exhaust tube to increase the downward angle, giving better flow and drainage for the raw water cooling. This was done to help keep saltwater from back flowing into the turbocharger. I have had to rebuild the port turbocharger once, and I replaced it last year. Even though the starboard turbocharger has never had a sign of saltwater damage, after twenty-two years it still needed replacement. The exhaust side of the housing rusts over time, decreasing the efficiency of the turbocharger and causing an increase in fuel consumption and a decrease in performance. Without a leak, the rust can still happen by condensation over time.
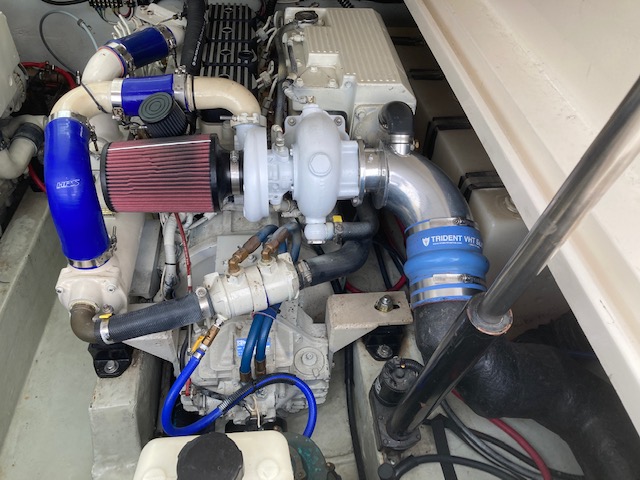
I purchased the new turbocharger last fall before the prices jumped up. I painted it and switched over any fittings I could until I was ready to install it this spring. With the boat still covered in shrink wrap, I went to work and fairly quickly had the old turbo off. It did take some time to drain the coolant out of the engine since the drain fitting is out of my reach and tucked away on the outboard side of the engine. Once it was drained of as much coolant as would come out, I set about removing all of the air and exhaust connections needed to remove the unit. Four bolts later and I had it lying on the deck.
Next, I had to clean up any gasket surfaces so I could get a good seal when putting this all together. Less chance of getting any leaks when it is cleaned! While cleaning I put rags in the exhaust pipe and other areas so if I drop something it does not fall inside the engine. That could ruin everything. Once all the gasket surfaces are cleaned up it is time to install the turbocharger on the engine. I had everything in place and bolted the turbo back on. After that was done, I had a funny feeling, “did I take the rag out of the exhaust pipe?” I did find a rag, I just was not sure if it was “the rag”. So instead of waiting for the worst to happen, I took the turbo back off. Yep, there was the rag just sitting there waiting for me! I removed it and once again put everything back together!
After cleaning up my tools I put coolant back into the engine and started both of them up checking for leaks. I am happy (and relieved) to report there are no leaks! With the major engine work out of the way, it was time to get the boat ready for launch. Again, I headed out to the marina, this time accompanied by my son. Once we got to the boat, he asked me what he could do. So, I put him to work right away, lying on a sheet of old shrink wrap scraping the old zinc paint and barnacles off of one propeller shaft. While he was engaged with that, I went into the engine room and changed the engine zincs. Then I went down on the ground and started on the other propeller shaft. No way would I let him have all of the fun!
When both shafts are clean and looking brand new, we each clean off the engine water intakes, the air conditioning inlet, both rudders and propellers and the trim tabs. Then I installed new shaft zincs, new trim tab zincs and new hull zincs. After that is done, I paint the running gear with zinc paint. It helps keep marine growth off and makes it much easier to clean at the end of the season. The last item I take care of before the boat is launched is greasing the rudder shafts. Even though the shafts are sealed with lip-type seals, over the years they have pitted allowing water to pass by them. Granted it is only a little bit it is still a leak. So, I installed grease fittings in the rudder posts and pumped about ten shots of food-grade grease into them. This stops the leaking and I may have to do it again later in the season.
Once I am done, I let the marina know and they get the bottom painted. My family has been getting the boat waxed for me for a few years now so the marina handles that also. They get the hull painted and waxed, and when it is in the water, they wax the topsides.
On the day of launching the boat, I show up to start the engines and move her to the slip we have had since the late nineties. Before I start the boat, I always make sure the seawater system is primed with water to keep the impellers from being damaged. Off to the slip we go to get ready for a test run.
One last thing I wanted to do this year was to make a sunshade that was easy and quick to set up without getting in the way. We did have a cockpit umbrella that we found was a little clumsy to use having a pole in the center of the cockpit that was always in the way. Last fall I purchased a set of telescoping fiberglass poles typically used for camping. These fit nicely into the aft mounted fishing rod holders. I was able to find a five-foot by seven-foot shade online made for just such a purpose. It took some time to set it up at the dock the other day and we may still have to make some adjustments to it but overall, it seems like it will work just fine. The forward end attaches to the hardtop mounted rod holders and the aft end attaches to those poles.
Have a safe summer on the water, if you see us hanging out in the shade come on over!