
Ternabout, my 20-foot sloop, had halyards that were wire-to-rope and original to the boat. After 20+ years of use, they were stiff as boards. The rope section was 5/16” line and the wire around 1/16”. I looked around for replacements but couldn’t find any stock halyards the right size. After pricing custom made halyards with the wire to rope splices, I was sure that wasn’t the way to go, either.
After thinking about it for a while, I decided to replace them with all rope halyards. Since I was going to get new halyards, why not go all the way and rig the new halyards to run back to the cabin? It tuned out to be a fairly simple job, as you will see.
Halyards:
The first job was to decide what type of line to use for the new halyards. There are a multitude of different types of line out there, Traditional three-strand, yacht braid, high-tech Kevlar and so on. I read all the magazines and ads. I finally decided on Sta-Set X line, manufactured by New England Ropes ((800) 333-6679). It was low stretch (the reason wire used to be so popular), designed to replace wire halyards and reputed to be long-lived. Incidentally, I found a reasonably priced source on Ebay.
I looked at the specifications to find out what size of line to use for Ternabout and quickly found that, for our size boats, almost any size line is more than strong enough. So, it came down to what size line was the smallest that would be comfortable to handle. Too small a line and it would be hard to hold and dig into your palms. I finally chose 5/16”, the same as the rope portion of my old halyards. Duh!
While Sta-Set X can be spliced, I’m not enough of a marlinspike seaman to do it. Anything beyond spliced three-strand baffles me. So, I had the eye splice on the jib and mainsail halyard done for me. The place I bought the line did them for about $5.00 a splice. On some fancy halyards, you may need to have the snap shackles spliced in place. My low-tech solution is to use a simple “D” shackle. I used a forged one because the surface was round and smooth. The stamped shackle has somewhat rough edges that might lead to chafing. I was sure to get a shackle with a captive pin, so I wouldn’t lose it.
I measured the rig several times to make sure I got enough line for both of the halyards. Up the mast, down the mast, back to the cockpit and several extra feet as an allowance for error gave me the lengths required.
Mast:
With the halyards in hand, it was time to address the mast issues. There are sheaves at the top of the mast that the halyards run over. The ones for wire/rope halyards usually have a wide groove for the rope with a narrow groove for the wire in the bottom of the rope groove. These are fine as long as there are no burrs to snag the new line. If there are, replace them with new Delrin plastic sheaves of the right size.
My old sheaves were metal, so I replaced them with a much nicer plastic version that had much less friction. Once I found a replacement sheave the same overall dimensions, it was simply matter of pulling the axle pins, replacing the pulleys and reinstalling the axle pin and cotter key. DON’T FORGET THE COTTER PIN!
In some cases, you can replace the halyards with the mast up. Tie, tape or sew the end of the new halyard to the tail of the old one and carefully pull them through sheaves at the top of the mast. Make sure the join is secure or you may end up having to take the mast down after all.
The next consideration is the base of the mast. To get the lines aft to the cockpit, you will need some sort of block at the base of the mast to turn the halyard. More than that, you will need to have something to fasten those blocks to. If you have a keel-stepped mast, you will probably have to attach the block to your cabin top. There are several styles of blocks available but make sure you get one with a spring around the block. This will keep the block vertical and not banging up your deck when the line is slack.
Before attaching a single block, lay out the lines and make sure that you won’t be hitting anything. Even modern, high-tech lines will chafe and fray.
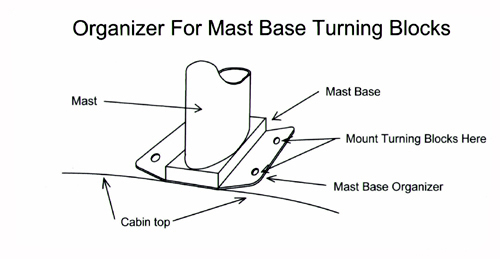
If you have a deck-stepped mast, companies like Dwyer Aluminum Mast Co. ((203) 484-0419) or Seal’s Spars and Rigging (510-521-7730) can supply plates that install beneath your existing mast base. These plates or organizers have a wing on each side with several holes for attaching various blocks and fittings.
My mast base had some extra holes that I was able to use. I spent a fair amount of time experimenting with various sizes and lengths of shackles until I got the halyards to run without any chafing.
Cabin Top:
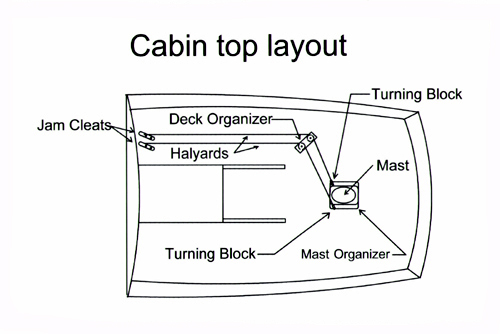
Okay, we’ve got the halyards down to the base of the mast. Where do we go from here? On some boats, you can run the line directly back to the cabin top. However, most boats have a companionway hatch in the center of the cabin top. Unless you can run the lines without fouling the hatch, you will need something called a deck organizer. These consist of several sheaves mounted flat on some sort of aluminum or stainless-steel bracket.
On Ternabout, I used a two-sheave unit, one sheave for the mainsail halyard and one for the jib halyard. Get one that can be disassembled for cleaning and lubrication. The deck organizer is bolted through the cabin top. Make sure you properly prepare and seal the fastener holes. (See All About Holes, SCA issues #9 & #10)
From the organizer, I led my halyards back to the rear edge of the cabin top. Many people use rope clutches to hold the ropes. I don’t have any other high-tech gear aboard, so I settled for two 4” aluminum open base jam cleats. Be sure to install them properly (see diagram).
To finish the installation, I added a jib sheet bag to the cockpit bulkhead below the cleats and added the proper label to show which cleat was for which halyard.
Results:
How did it work? Well, generally pretty well. I did notice that it did take more effort to raise the jib and main. This is due to the fact that the halyards had to go through more blocks and sheaves. Since you usually don’t raise and lower the main and jib that often during a sail, it wasn’t a problem.
What did bug me, though, was having to go out on the foredeck to lower the jib and strap it in place with a couple of bungee cords. It tends to get a little busy when you’re single-handing and isn’t the safest place to be when you are alone. I found the answer in one of my old issues of Small Boat Journal.
It’s called a “Gerr Downhaul” and was invented by the New York naval architect, Dave Gerr. I used 1/4” yacht braid for mine and I’ll try to describe it as well as provide a diagram. One end of the line is attached to the head of the jib. The line is then laced down through the jib hanks to a point perpendicular to the clew. I tied a stainless-steel ring to the jib hank nearest this point with Monel safety wire. Be careful not to interfere with the operation of the hank or chafe the sail.
I then attached a block either side of the sail. (I don’t know if they still do it, but Harken used to sell key chains at their booth at boats shows. These key chains were simply their small blocks with a light stainless-steel ring attached. You could by these things for a buck or two apiece. I always picked up a couple for miscellaneous projects. They are ideal for this kind of job).
The downhaul line goes through the starboard side block and then through the clew grommet. From there it goes back up to the block on the port side of the jib. From that block it goes down to a third block attached somewhere around the forestay fitting and then back to the cockpit.
To use the downhaul, you slack off the jig halyard and begin pulling the downhaul line. This pulls the jib down as it pulls it forward. It all ends up in a neat bunch at the base of the forestay. Sort of a poor man’s jib furler.
With this last addition, single-handing Ternabout became a breeze. Hope this helps you sort out your halyards!