In last month’s installment, we discussed removing old bottom paint, repairing imperfections, and getting the vessel prepped for repainting.
Time to paint
The paint should be shaken at the store and mixed again before use. When any paint sits for some time the components will separate and settle to the bottom. The store’s shaker gets everything mixed thoroughly and ready for use. Back at the boat, before stirring you can turn the cans upside down to get the sediment to start remixing. Stir thoroughly with a drill attachment. Use an air compressor and trigger nozzle to blow any remaining contaminants from the surface to be painted. Further prep the surface by wiping it with acetone or any fiberglass/boat paint prep solvent.
Two Part Epoxy Barrier Coat
Pettit Paint has a handy quantity calculator used to estimate the amount of paint for your particular project ( https://www.pettitpaint.com/how-to-advice/quantity-calculator/). The barrier coat seals the gel coat and prevents water intrusion and blistering in the future. Start by mixing the 2-part epoxy paint. The paint needs approximately 30 minutes to set up (induction time) and has a pot life of 10 hours. Be careful as these times vary with temperature and wind. You must use proper PPE. Which thanks to covid we all know means Personal Protective Equipment. Make sure you have a properly fitted respirator with current and appropriate carbon filters. Tape off the waterline with quality painters’ tape. Once the paint is mixed and has reached its induction period it is time to apply. Load up a 3/8ths inch nap roller with paint. Be sure to use adequate pressure in the pan to force a good portion of the paint out of the roller and back into the pan. A big mistake you should avoid is using an overloaded roller. Start from the waterline and work your way down to the chine. Use nice even strokes and pressure and avoid re-rolling or touching up areas that have just been painted. Start in the middle of a section working to the outsides. Your goal is to get a nice evenly applied smooth coat. Have a brush or mini roller ready to work into areas like shaft pockets and other tight spaces. Do not paint the metal thru-hulls or transducers, these will be addressed later. You can stagger colors between coats to visually assistant in applying subsequent overcoats. The time between coats can be anywhere from 2 to 5 hours. This is the minimum dry time, you can wait weeks to months between coats without having to sand, just make sure the painted area is clean before applying the next coat. Pettit recommends a minimum of 2 coats of barrier paint. The last coat of barrier and first coat of bottom paint must be done on the same day.
The most crucial timing consideration with no room for error is applying the first coat of bottom paint. These must be done together as a process. So, make sure there is an adequate weather window and you have enough time in the day to complete both tasks. The time between your last coat of barrier paint and the first coat of bottom paint is between 3-7 hours depending on air temperature, wind, and sun with a 3-hour window to complete the process. The Bottom paint coat must be applied to tacky yet dry to the touch primer. Once the primary coat of bottom paint is applied you have plenty of time to apply subsequent coats. There are minimum dry times specific to each paint manufacturer, as well as full minimum cure times before launch. I found Petitt Paint to have the easiest to understand and most fore-giving timetables.
When selecting your bottom paint make your life easier in future seasons by having a signal color. The first coat of bottom paint should be a different color from subsequent coats. It should also not be ablative, instead, this coat should be hard. Two good choices are Pettit Unepoxy or HRT Premium bottom paint. The Unepoxy costs less and does the same job, the HRT Premium works but is considered overkill for a signal coat. Remember, this coat is a guide coat and should be a different color than the topcoat(s) to signal when and where new paint is needed. It is not necessary to use a drastically different color, just enough to notice where the paint needs to be reapplied next spring. For our project, we chose dark blue as the signal coat and black as the top. So next season before launch touch-ups will be made to any area where blue paint is showing. After the signal coat dried the project boat was coated with 2 additional coats of Odyssey multi-season ablative paint. Other options would have been Triton, or Hydrocoat, just make sure it’s multi-season and ablative. In the seasons to follow you will most likely not need to recoat for 3-4 years. After 2 years, it should be thoroughly inspected, if the signal coat is exposed, apply 2 fresh coats of multi-season ablative paint to those areas.
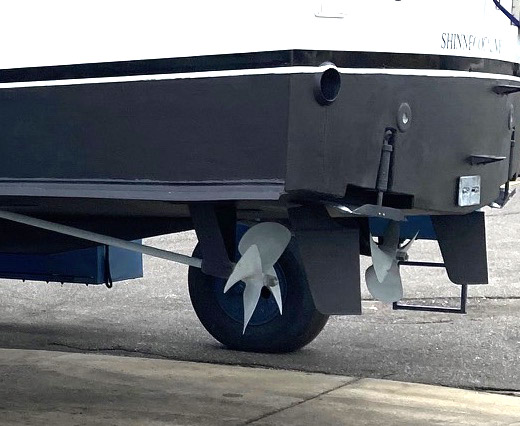
It is a good idea to tape off transducers, shafts, underwater lights, rudders, props, and anything metal. Using saran wrap and painter’s tape makes this task simple. Tapping these off will remind you not to paint these surfaces and protect them from accidental drips. Transducers should be painted with paint specifically engineered not to interfere or affect the performance of the transducer. Using a product that gives you a spray can option makes this task very simple. All other metals will need to be primed and painted with nonmetallic paint. Dissimilar metals submerged in saltwater can lead to electrolysis and premature wear. Depending on the manufacturer you select follow their guidelines on priming. Once primed make sure you selected an ablative no metallic anti-fouling paint. One such paint is Pettitt’s Hydrocoat Eco series. It is a copper-free water-based self-polishing ablative antifouling paint. It has the highest level of metal-free ECONEA® biocide available and is combined with a powerful slime fighting inhibitor to provide multi-season protection. Another good option is Zinc based antifoul paint. Zinc is a softer metal than most everything on a boat and will not harm other denser metals in saltwater. Prop coat barnacle barrier comes in gray both in a spray can and quart sizes. Spraying is easiest and ensures even coating. Three coats are recommended with 5 minutes between coats. If you miss the 5-minute window you need to wait 1 hour between coats. Once complete a 24-hour cure time is recommended before launch. If you are painting the shafts do not spray directly into cutlass bearings!
Stripping, repairing, and repainting a boat’s bottom is not a simple or quick project. Make sure you and any parties involved have the time to focus on completing it before you start. Consider that weather can and will play a role in how quickly the various stages will be complete. Make an appointment ahead of time. If your marina knows the plan, they may put you in a separate part of the yard and block the boat higher than usual.
Once completed. the largest benefit of going through this process is peace of mind. Addressing small problems before they become large expensive ones will save you time and money down the road. You will also see savings in not having to completely bottom paint again. Just touch up where your signal coat has worn thru. Removing the paint build-up to all the thru-hull screens will also improve water flow and performance to engines, generators, air conditioners, and other water-cooled appliances. This will improve performance, and fuel economy in the long run.